desired language:
Hello! Please choose your
desired language:
desired language:
Dismiss
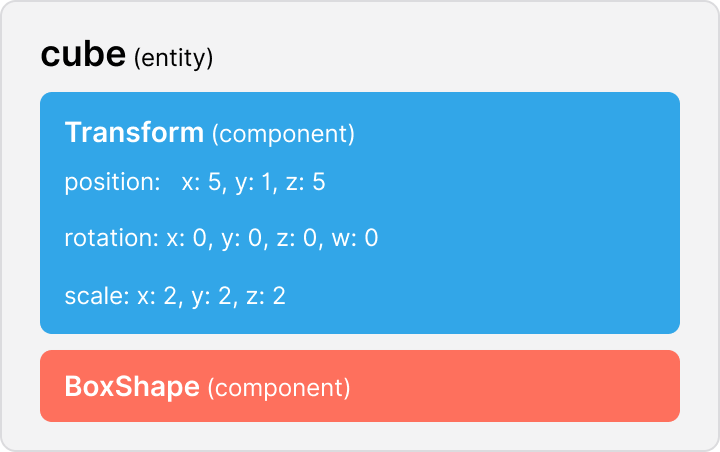
Set Entity positions
You can set the position, rotation and scale of an entity by using the Transform component. This can be used on any entity, which can also a primitive shape component (cube, sphere, plane, etc) or a 3D model component (glTF, Obj).
// Create a new entity
const ball = new Entity()

// Add a transform component to the entity
ball.addComponent(new Transform())
ball.getComponent(Transform).position.set(5, 1, 5)
ball.getComponent(Transform).scale.set(2, 2, 2)
For brevity, you can also create a Transform entity and give it initial values in a single statement, passing it an object that can optionally include position, rotation and scale properties.
myEntity.addComponent(
  new Transform({
    position: new Vector3(5, 1, 5),
    rotation: new Quaternion(0, 0, 0, 0),
    scale: new Vector3(2, 2, 2),
  })
)
To move, rotate or resize an entity in your scene, change the values on this component incrementally, frame by frame. See Move entities for more details and best practices. You can also use the helper functions in the utils library to achieve this more easily.
Position
position is a 3D vector, it sets the position of the entity’s center on all three axes, stored as a Vector3 object.
// Create transform with a predefined position
let myTransform = new Transform({ position: new Vector3(1, 0, 1) })

// Set each axis individually
myTransform.position.x = 3
myTransform.position.y = 1
myTransform.position.z = 3

// Set the position with three numbers (x, y, z)
myTransform.position.set(3, 1, 3)

// Set the position with an object
myTransform.position = new Vector3(5, 1, 5)
Note: When setting the value of the position with an object, you can either use a
Vector3object, or any other object with x, y and z fields.
When setting a position, keep the following considerations in mind:
-
The numbers in a position vector represent meters (unless the entity is a child of a scaled entity).
-
A scene that is made up of a single parcel measures 16m x 16m. The center of the scene (at ground level) is at
x:8, y:0, z:8. If the scene is made up of multiple parcels, then the center will vary depending on their arrangement. -
x:0, y:0, z:0refers to the South-West corner of the scene’s base parcel, at ground level.Tip: When viewing a scene preview, a compass appears in the (0,0,0) point of the scene with labels for each axis as reference.
Tip: Take your left hand, your index finger (pointing forward) is the z axis, your middle finger (pointing sideways) is the x axis, and your thumb (pointing up) is the y axis.
Note: You can change the base parcel of a scene by editing the
baseattribute of scene.json. -
If an entity is a child of another, then
x:0, y:0, z:0refers to the center of its parent entity, wherever it is in the scene. -
Every entity in your scene must be positioned within the bounds of the parcels it occupies at all times. If an entity leaves these boundaries, it will raise an error.
Tip: When viewing a scene in preview mode, entities that are out of bounds are highlighted in red.
-
Your scene is also limited in height. The more parcels that make up the scene, the higher you’re allowed to build. See scene limitations for more details.
Rotation
rotation is stored as a quaternion, a system of four numbers, x, y, z and w.
// Create transform with a predefined rotation in Quaternions
let myTransform = new Transform({ rotation: new Quaternion(0, 0, 0, 1) })

// Set rotation with four numbers (x, y, z, w)
myTransform.rotation.set(0, 0, 1, 0)

// Set rotation with a quaternion
myTransform.rotation = new Quaternion(1, 0, 0, 0)
You can also set the rotation field with Euler angles, the more common x, y and z notation with numbers that go from 0 to 360 that most people are familiar with. To use Euler angles, use one of the following notations:
// Create transform with a predefined rotation in Euler angles
let myTransform = new Transform({ rotation: Quaternion.Euler(0, 90, 0) })

// Use the .setEuler() function
myTransform.rotation.setEuler(0, 90, 180)

// Set the `eulerAngles` field
myTransform.rotation.eulerAngles = new Vector3(0, 90, 0)
When using a 3D vector to represent Euler angles, x, y and z represent the rotation in that axis, measured in degrees. A full turn requires 360 degrees.
Note: If you set the rotation using Euler angles, the rotation value is still stored internally as a quaternion.
When you retrieve the rotation of an entity, it returns a quaternion by default. To obtain the rotation expressed as in Euler angles, get the .eulerAngles field:
myEntity.getComponent(Transform).rotation.eulerAngles
Add Rotations
Another option is to perform a rotate operation on an existing transform, which adds to its current rotation. The rotate operation takes a vector that indicates a direction, and a number of degrees to rotate. In the following example, we’re tilting an entity 15 degrees along the X axis, which adds to whatever rotation it initially had:
myTransform.rotate(new Vector3(1, 0, 0), 15)
The rotate operation is useful when dealing with an entity that’s rotated in multiple axis, for example both X and Y. The following example sets an original rotation in the Y axis, and then rotates the Transform along the X axis:
myTransform.rotation.setEuler(0, 90, 0)
myTransform.rotate(new Vector3(1, 0, 0), 15)
Note that this produces a different result than if you simply set the initial rotation to (15, 90, 0). In the example, the rotation along the X axis doesn’t occur along the original X axis of the Transform, but instead it occurs along the tilted X axis that results from the initial rotation.
Face the player
Add a Billboard component to an entity so that it always rotates to face the player.
Billboards were a common technique used in 3D games of the 90s, where most entities were 2D planes that always faced the player. The same idea can also be used to rotate a 3D model.
let box = new Entity()
box.addComponent(new BoxShape())
box.addComponent(
  new Transform({
    position: new Vector3(5, 1, 5),
  })
)
box.addComponent(new Billboard())
engine.addEntity(box)
You can choose which axis to rotate as a billboard. For example, if the Billboard of a cube only rotates in the Y axis, it will follow the player when moving at ground level, but the player will be able to look at it from above or from below.
The three optional parameters when creating a Billboard component are booleans that refer to the x, y, and z axis. They are all true by default.
// rotate on all three axis
let FullBillboard = new Billboard())

// rotate only in the X axis
let XBillboard = new Billboard(true, false ,false)

// rotate only in theY axis
let YBillboard = new Billboard(false, true ,false)

// rotate only in the Z axis
let ZBillboard = new Billboard(false, false ,true)
Tip: To rotate an entity so that it follows the player around while at ground level, give it Y axis rotation.
Billboards are also very handy to add to text entities, since it makes them always legible.
The rotation value of the entity’s Transform component doesn’t change as the billboard follows players around.
If an entity has both a Billboard component and Transform component with rotation values, players will see the entity rotating as a billboard. If the billboard doesn’t affect all axis, the remaining axis will be rotated according to the Transform component.
Note: If there are multiple players present at the same time, each will see the entities with billboard mode facing them.
Face a set of coordinates
You can use lookAt() on the Transform component to orient an entity fo face a specific point in space by simply passing it that point’s coordinates. This is a way to avoid dealing with the math for calculating the necessary angles.
// Create a transform
let myTransform = new Transform()

// Rotate to face the coordinates (4, 1, 2)
myTransform.lookAt(new Vector3(4, 1, 2))
This field requires a Vector3 object as a value, or any object with x, y and z attributes. This vector indicates the coordinates of the position of the point in the scene to look at.
The lookAt() function has a second optional argument that sets the global direction for up to use as reference. For most cases, you won’t need to set this field.
Scale
scale is also a 3D vector, stored as a Vector3 object, including the scale factor on the x, y and z axis. The shape of the entity scaled accordingly, whether it’s a primitive or a 3D model.
You can either use the set() operation to provide a value for each of the three axis, or use setAll() to provide a single number and maintain the entity’s proportions as you scale it.
The default scale is 1, so assign a value larger to 1 to stretch an entity or smaller than 1 to shrink it.
You can either set each dimension individually, or use the set operation to set all dimensions.
// Create a transform with a predefined scale
let myTransform = new Transform({ scale: new Vector3(2, 2, 2) })

// Set each dimension individually
myTransform.scale.x = 1
myTransform.scale.y = 5
myTransform.scale.z = 1

// Set the whole scale with one expression  (x, y, z)
myTransform.scale.set(1, 5, 1)

// Set the scale with a single number to maintain proportions
myTransform.scale.setAll(2)

// Set the scale with an object
myTransform.scale = new Vector3(1, 1, 1.5)
When setting the value of the scale with an object, you can either use a Vector3 object, or any other object with x, y and z fields.
Inherit transformations from parent
When an entity is nested inside another, the child entities inherit components from the parents. This means that if a parent entity is positioned, scaled or rotated, its children are also affected. The position, rotation and scale values of children entities don’t override those of the parents, instead these are compounded.
If a parent entity is scaled, all position values of its children are also scaled.
// Create entities
const parentEntity = new Entity()
const childEntity = new Entity()

// Set one as the parent of the other
childEntity.setParent(parentEntity)

// Create a transform for the parent
let parentTransform = new Transform({
  position: new Vector3(3, 1, 1),
  scale: new Vecot3(0.5, 0.5, 0.5),
})

parentEntity.addComponent(parentTransform)

// Create a transform for the child
let childTransform = new Transform({
  position: new Vector3(0, 1, 0),
})

childEntity.addComponent(childTransform)

// Add entities to the engine
engine.addEntity(childEntity)
engine.addEntity(parentEntity)
You can use an invisible entity with no shape component to wrap a set of other entities. This entity won’t be visible in the rendered scene, but can be used to group its children and apply a transform to all of them.
Attach an entity to the player
Set an entity as a child of the Attachable.FIRST_PERSON_CAMERA object to fix the entity to the player and follow the player’s movements.
const followTheCamera = new Entity()
followTheCamera.addComponent(new BoxShape())
followTheCamera.addComponent(
  new Transform({
    position: new Vector3(0, 0.5, 3),
  })
)
engine.addEntity(followTheCamera)
followTheCamera.setParent(Attachable.FIRST_PERSON_CAMERA)
If the attached entity has a Transform component, it will be positioned relative to the player’s position, and keep that relative position as the player moves or rotates.
To fix an entity’s rotation only in the x axis to the player, set an entity as a child of the Attachable.AVATAR object. The entity will then rotate with the player when looking around at ground level, but it won’t accompany the player’s rotation when looking up or down.
const followAvatar = new Entity()
followAvatar.addComponent(new BoxShape())
followAvatar.addComponent(
  new Transform({
    position: new Vector3(0, 0.5, 3),
  })
)
engine.addEntity(followAvatar)
followAvatar.setParent(Attachable.AVATAR)
Note: To set an entity as a child of
Attachable.FIRST_PERSON_CAMERAorAttachable.AVATAR, you need to first add the entity to the engine. If you attempt to set the entity as child of the player before adding it to the engine, it will raise an error.
Both Attachable.FIRST_PERSON_CAMERA and Attachable.AVATAR behave similarly, but have subtle differences:
With Attachable.FIRST_PERSON_CAMERA:
- The entity is at eye-level of the player
- In 1st person: Entity rotates on all axis, staying in a fixed position on the camera.
- In 3rd person: Entity rotates on only the y axis with the camera
With Attachable.AVATAR:
- The entity is arm or waist level of the player
- 1st person: Entity rotates on only the y axis with the camera
- 3rd person: Entity rotates on only the y axis with the camera
This gif illustrates the difference in 1st person. The pink entity uses Attachable.AVATAR, the white object uses Attachable.FIRST_PERSON_CAMERA.
If several players are in the same scene, they will each experience the entity as attached to themselves. They will not see the entity attached to other players.
For example, in a multiplayer scene where players can pick up boxes and move them around, the recommended approach is to make boxes that are being carried by other players invisible. So that only players that are currently carrying a box see them attached to themselves.
Scene boundaries
All entities in your scene must fit within the scene boundaries, as what’s outside those boundaries is parcels of land that are owned by other players.
When running a preview of your scene, any entities outside the scene’s parcels are colored red and their colliders are removed. When deployed to Decentraland, any entities outside the parcels will not be rendered at all by the engine.
The position of entities in your scene is constantly being checked as they move, if an entity leaves the scene and then returns it will be removed and then rendered normally again.
A grid on the scene’s ground shows the limits of the scene, which by default rage from 0 to 16 on the x and z axis, and up to 20 on the y axis. You’re free to place entities underground, below 0 on the y axis.
Tip: If your scene needs more parcels, you can add them in the project’s
scene.jsonfile. See Scene metadata for instructions. Once added, you should see the grid extend to cover the additional parcels.
It’s important to note that the entire 3D model must be within the scene’s bounds. This includes the model’s bounding box. Some 3D models may have bounding boxes that unnecessarily extend beyond the meshes themselves, and it can sometimes be tricky to tell when this happens. When an entity extends beyond the scene’s boundaries, in the preview you’ll see a cube that marks these bounding boxes. The entire cube must fit within your scene.
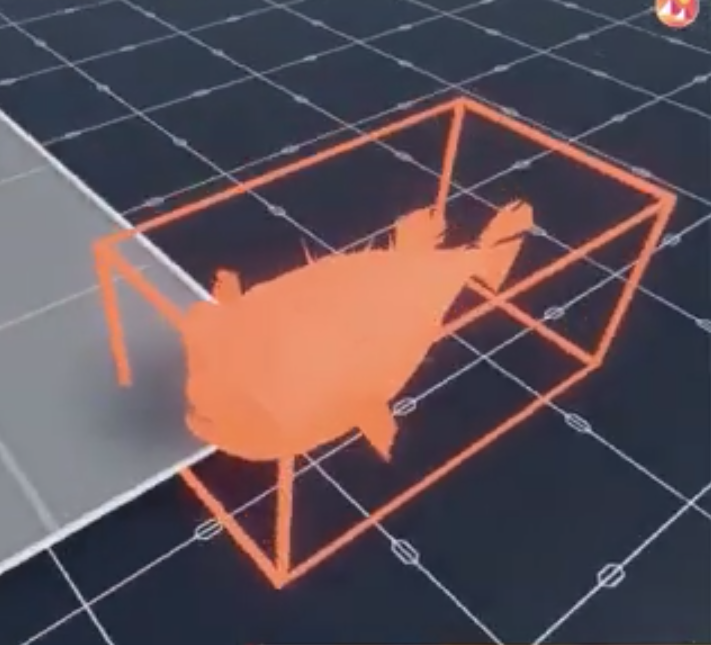
If an entity’s cube extends beyond the shape of its meshes, you might need to edit the 3D model in an external editor to reduce these margins, or to bake the rotation and scale of the meshes in the model.
Was this article useful?
Awesome!
Anything we can do to make it even better?
We're sorry!
Please let us know how we can improve our documentation.
Thank you!
Your feedback helps us improve everyone's experience in Decentraland.
Have a suggestion?
Edit this doc on GitHub